Menu Flow
The basic flow of modern video games takes cues from the classic coin-operated video games of the early 80s. To provide great UX, use the following core steps to structure the menu flow of a video game:
- Introduce the game.
- Provide information on the rules and controls of the game.
- Play the game.
- Return the results of a gameplay session.
As games became more complex and customizable, more menus were added to allow players to adjust gameplay, track statistics, and analyze the player’s progress:
Core menus:
- Title screen
- Main menu
- Settings
- Controller layout
- Loading screen
- Save or load the game
- End of a game or round
Additional menus:
- Lobby
- Customization
- Loadout
- Leaderboards
- Achievements / Progression
- Marketplace
- Skill Tree
Title screen
This screen is where the player will get the first impression of the game. The screen will present the name and graphic identity of the game, its most representative images or symbols, and perhaps its basic rules. It is a best practice to display the title of your game along with a button prompt, such as “Press the A button to start”.
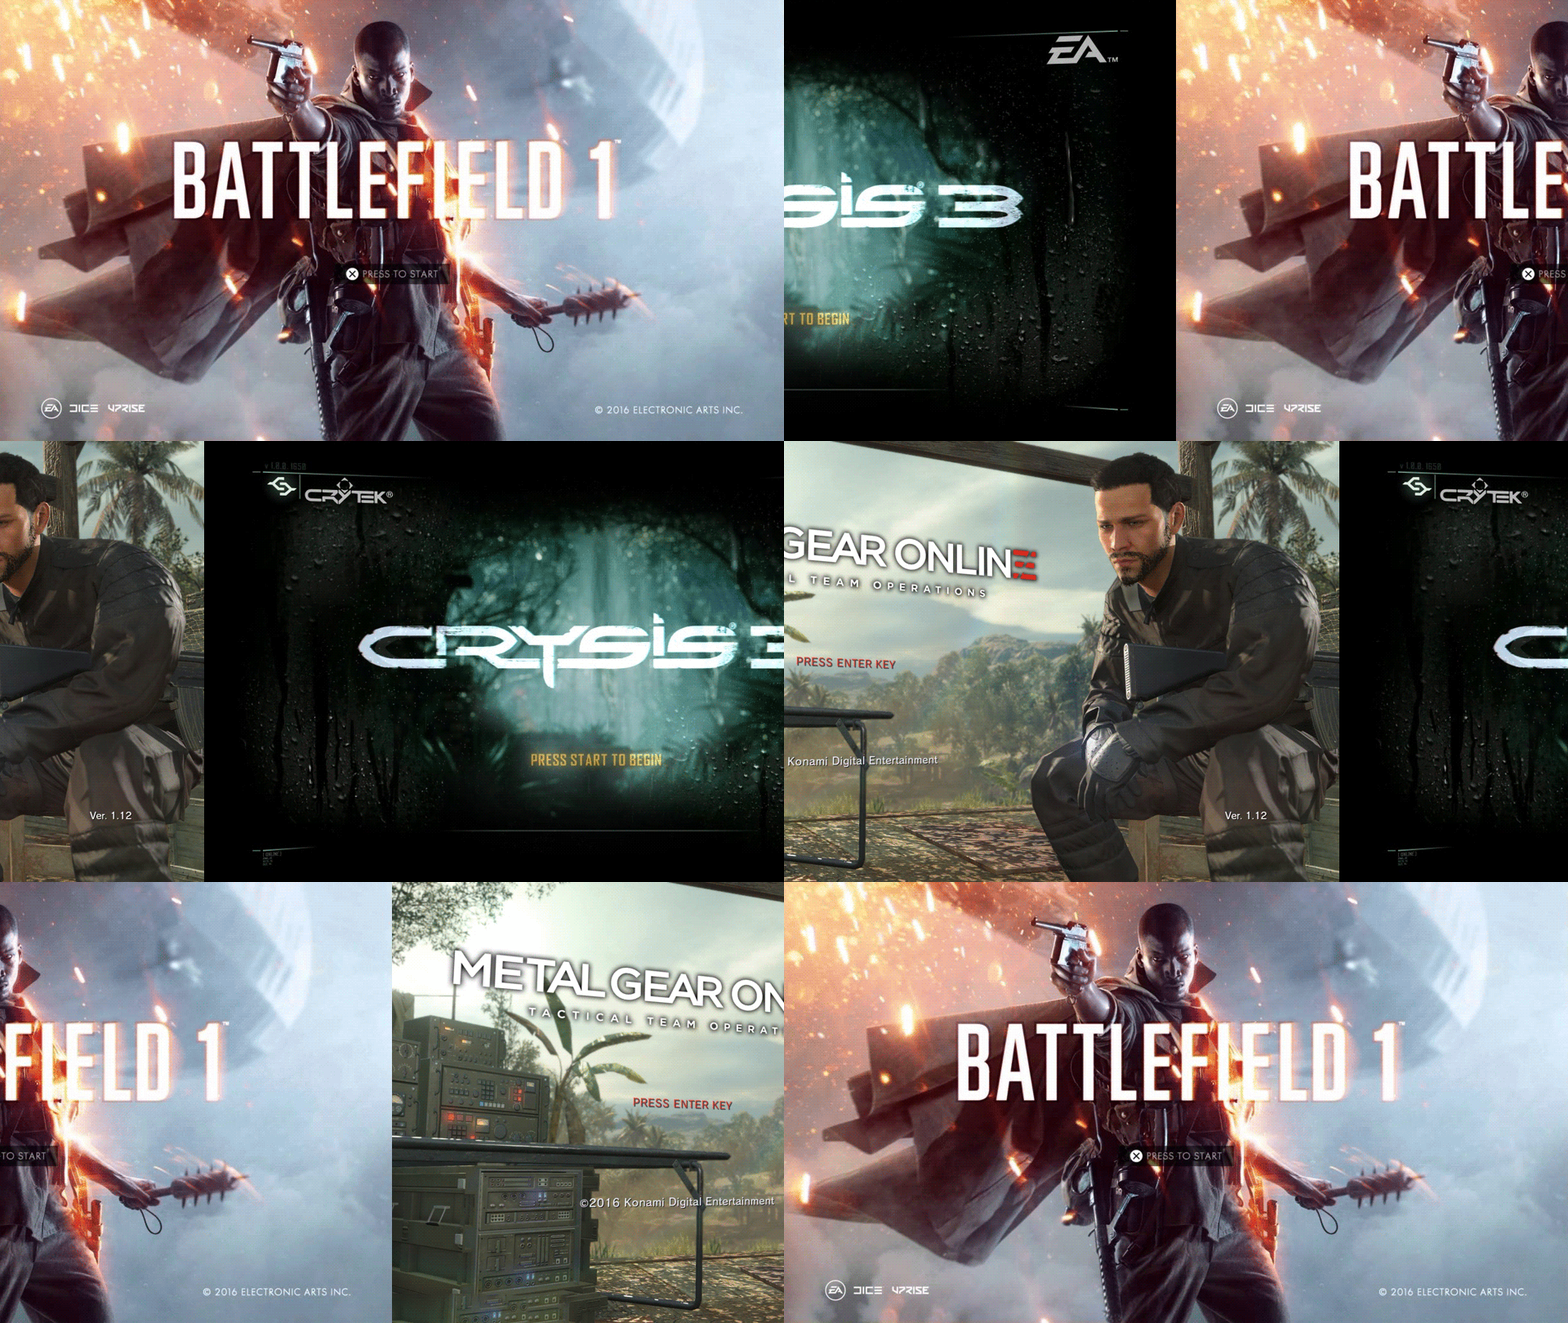 Screenshots from Crysis 3, Metal Gear Online, Battlefield 1
To come up with a title screen most representative of your game, do extensive research, find out what is possible, and work with the Art Director and Marketing.
The following collage shows some examples of the title screens:
- Battlefield, which plays a pre-rendered movie
- Metal Gear Online, which uses in-game graphics and characters
- Crysis 3, which uses some visual effects on a static background
Main Menu
The Main Menu screen is the hub of the front-end menus and a gateway into the game. Think of the Main Menu as the trunk of a tree and of sub-menus as the tree’s branches. Most games will display a list of menu links accessible with the D-Pad, Left Stick, A button, and B button.
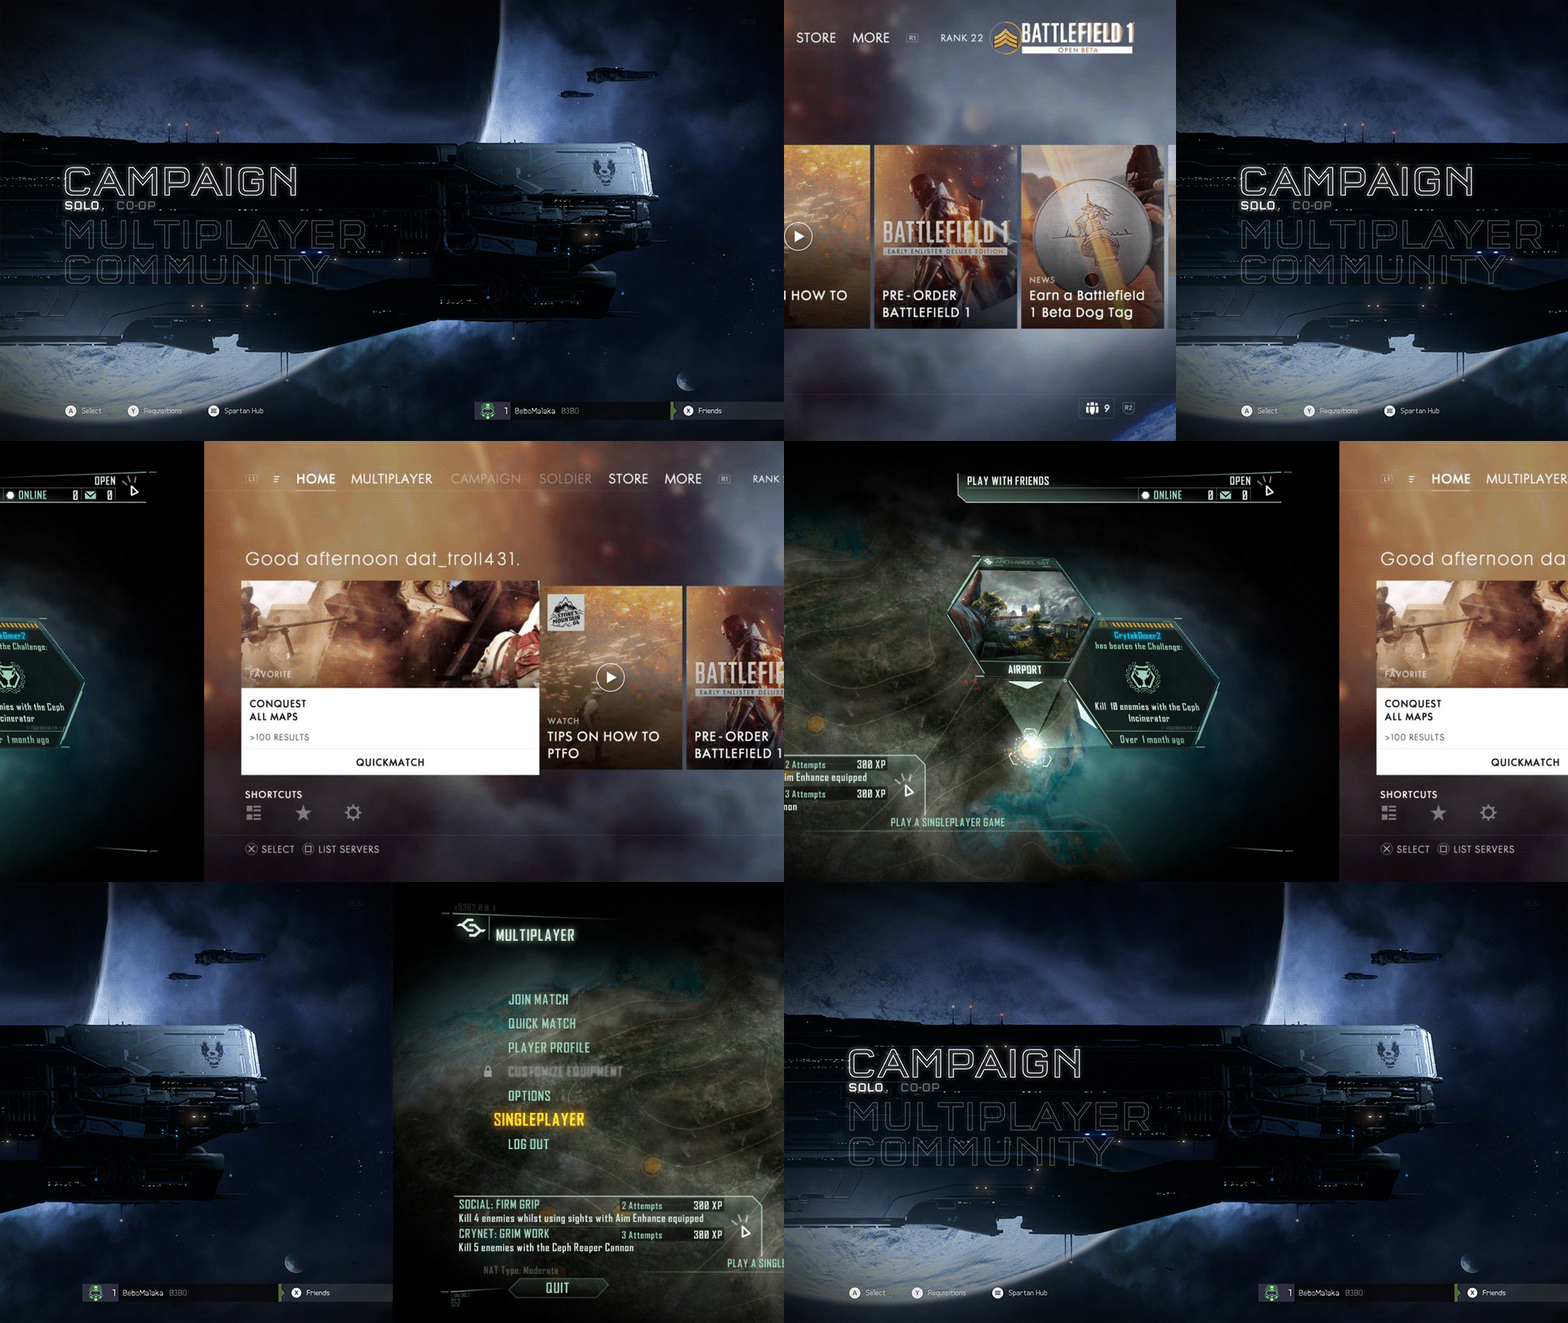 Screenshots from Halo 4, Battlefield 1, Crysis 3
Design a menu flow that lets the player enter the game by using only the A button. Let the first category in each menu direct the player to the next menu, and so on, until the game starts.
A player who gets lost in the menus should be able to get back to the Main Menu by pressing the B button as many times as necessary. Once in the Main Menu, the player should not be able to navigate back to the Start screen, which is best reserved for loading the front-end UI.
Design the Main Menu to convey the game’s layout, Shape Language, font, and color schemes:
Settings and options
The settings, which are usually found in the front-end and in-game menus, allow the player to customize the visual, audio, and gameplay controls. Make the settings legible, and group them by function.
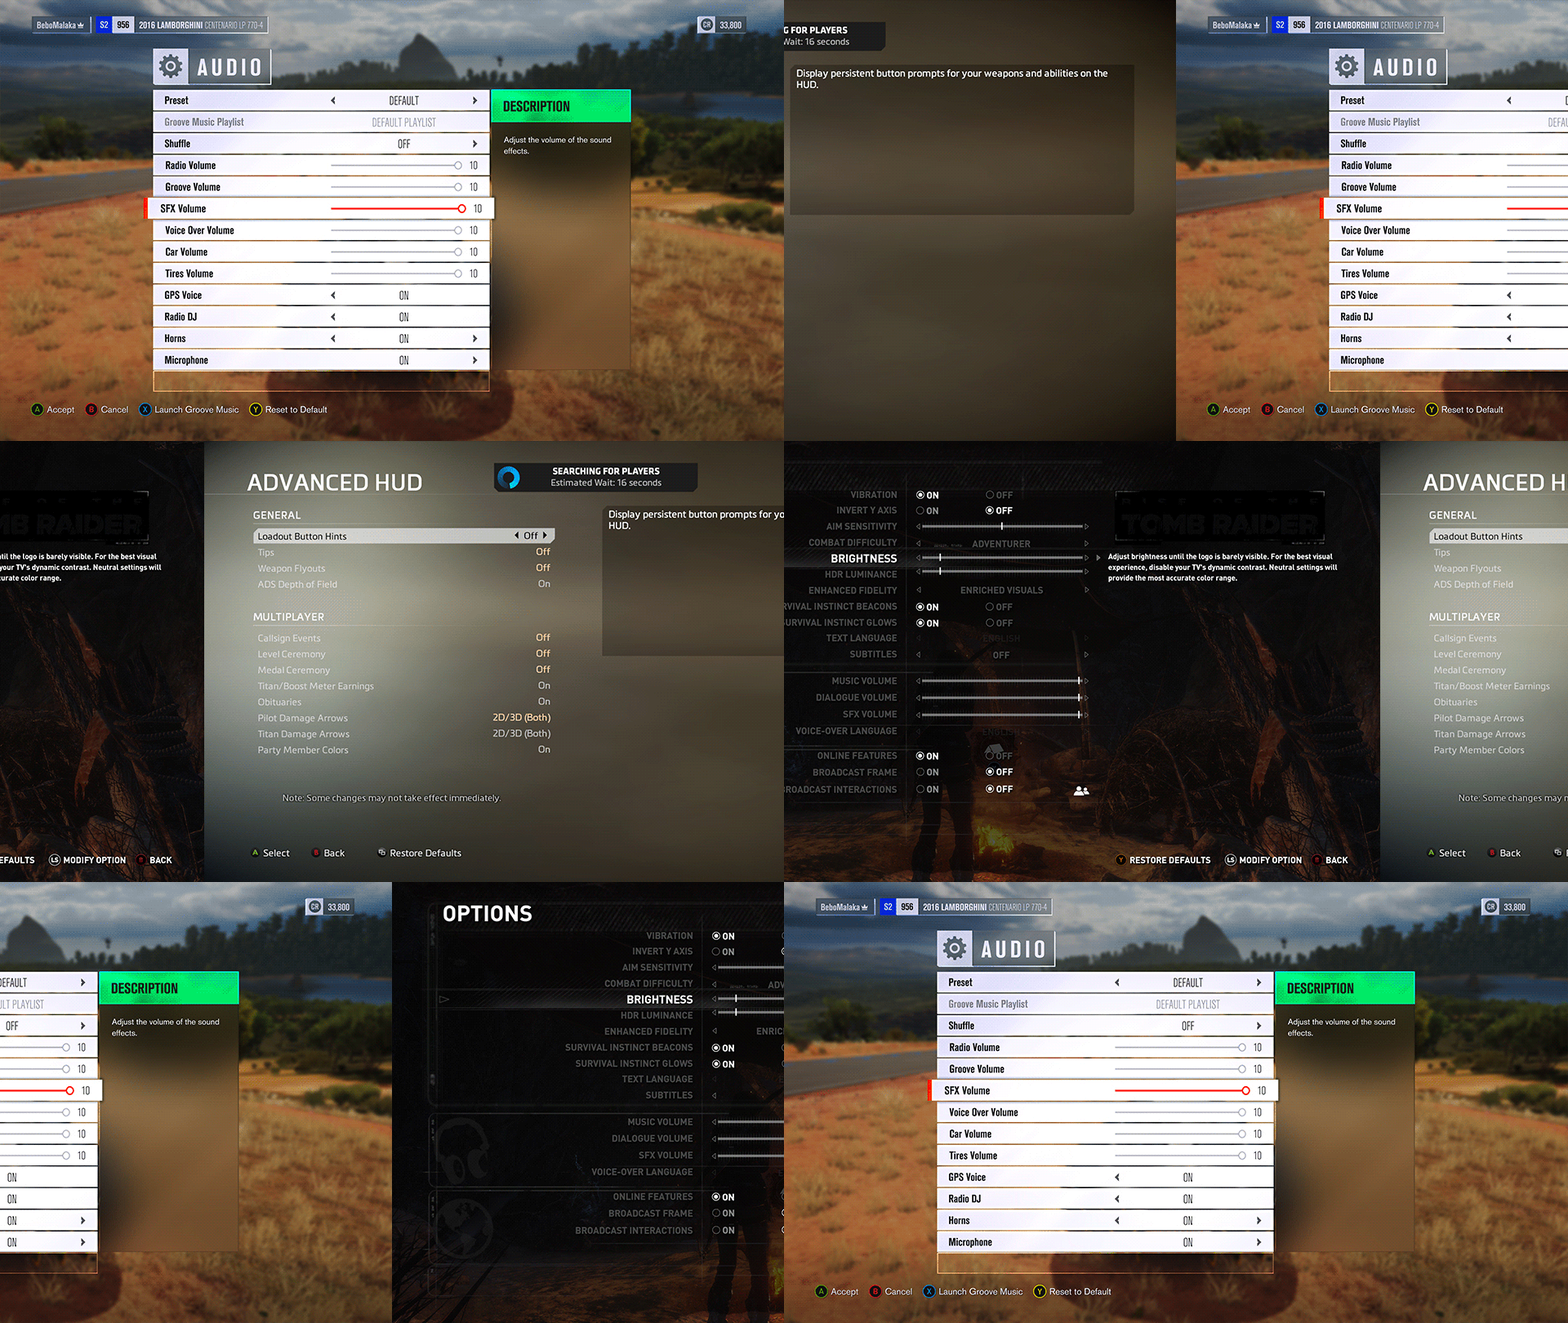 Screenshots from Rise of the Tomb Raider, Forza Horizon 3, Titanfall 2
Visual settings can include adjustments for brightness and contrast. If your game has very bright or dark environments, display these settings when a player starts the game for the first time. These screens should also be available in the Settings menu, to let the player make adjustments without having to start a new game session.
Here are a few common settings and option screens found in games:
- Language and Subtitles
- Voiceover
- Audio: Volume, Music, SFX, and Voice
- Brightness and Contrast: HDR or SDR
- Display: HUD, Notifications, Guides, Maps, and Chat
- Gameplay Controls: Invert Y, Vibration, Auto Aim, Game Difficulty, and AI Difficulty
- Controller Layout: Layout Choices
Tip: When displaying multiple slider bars or numerical values, show only the arrow prompts on the setting in focus. Rendering multiple arrows at the same time causes clutter.
Controller Layout
All text and buttons of the Controller Layout screen must be legible from at least 6 feet away.
The following are examples of well-designed Controller Layout screens:
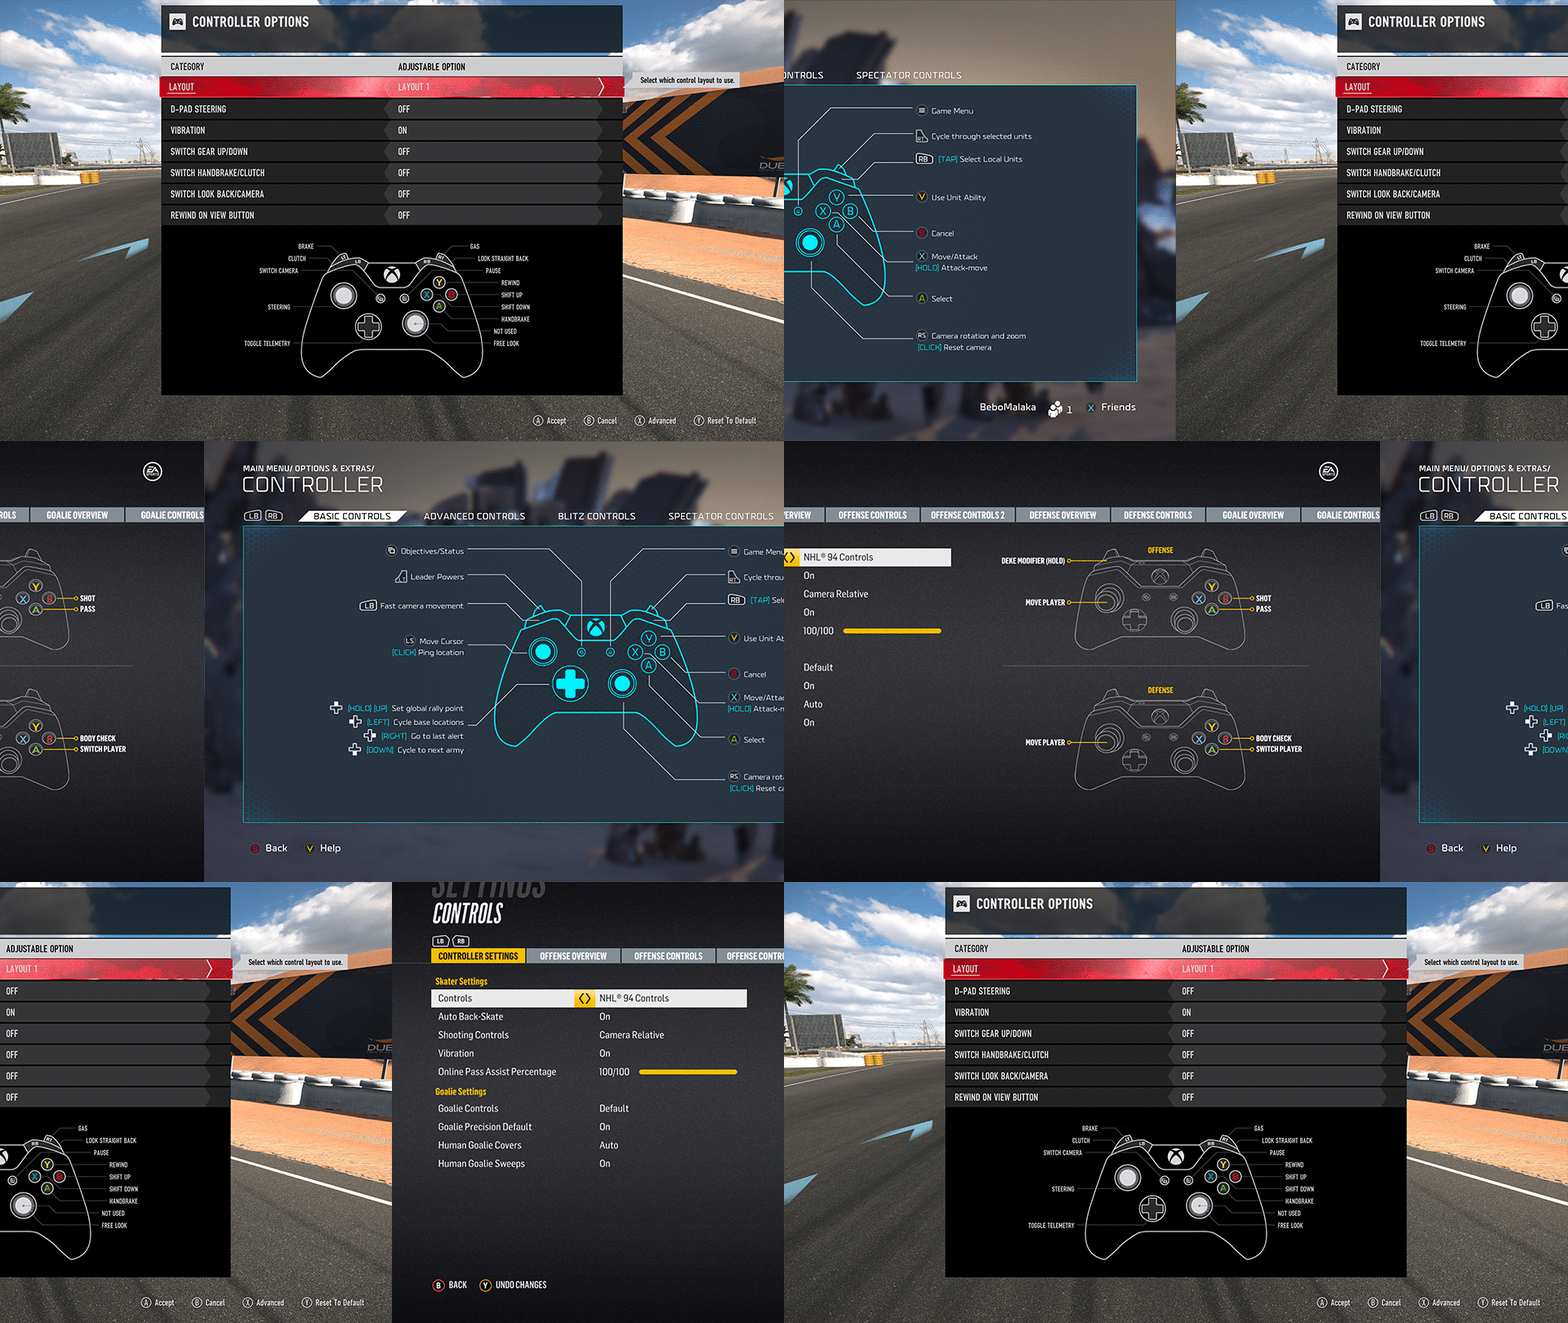 Screenshots from Halo Wars 2, NHL 18, Forza Horizon 3
If providing multiple controller layout options for different types of gameplay, make each control distinguishable. A good navigation will use a tab or twist-tab menu that allows the player to cycle through options by using the LB and RB shoulder buttons or the Left and Right controls on the D-Pad.
Tip: Design buttons that are legible and stand out against the background. For button descriptions, use a font size of at least 24pt, make the descriptions short, and avoid repetition.
Loading
The Loading screen is displayed while the player is waiting for the game to load. The screen can display a clockwise-rotating graphic image along with some text, such as “Loading”, to indicate that the game is still loading and has not crashed or locked up the system. This screen can also be used to present the controller mapping as well as the tips and tricks for playing the game.
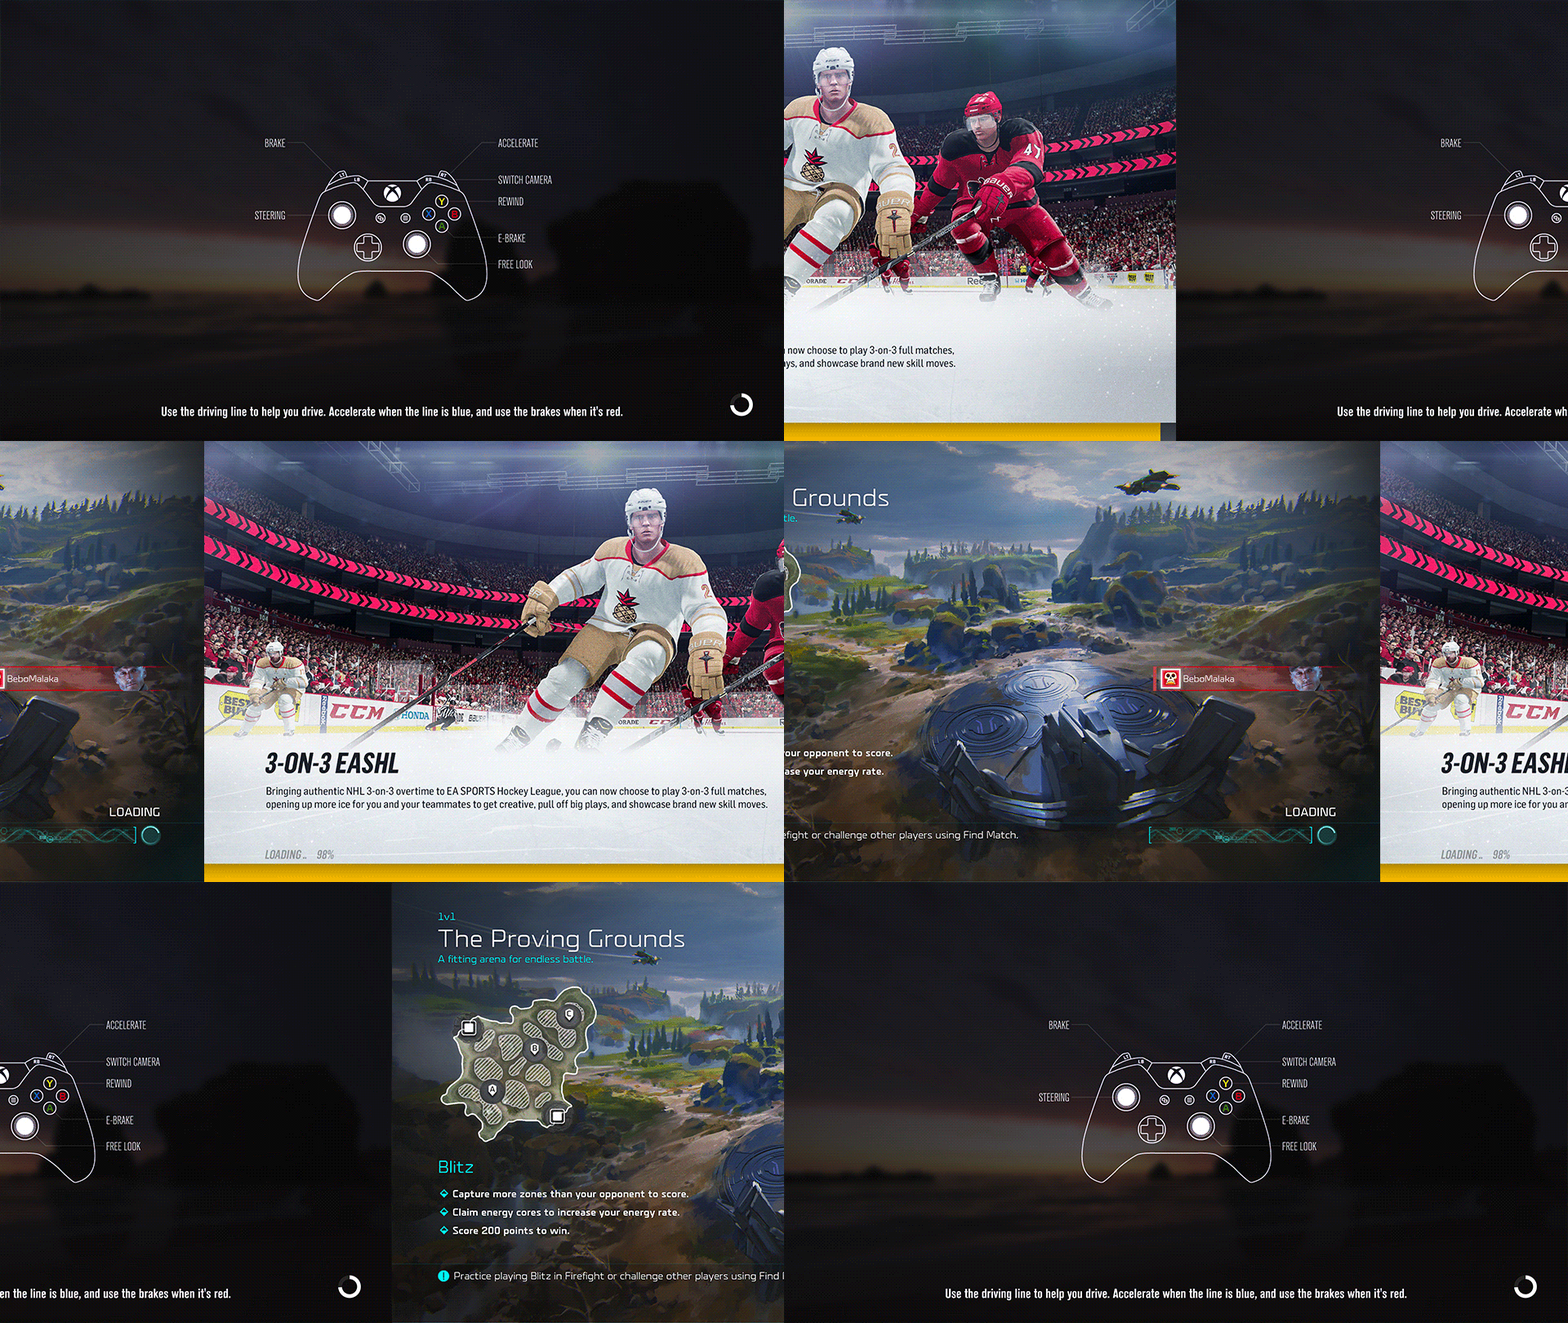 Screenshots from Forza Horizon 3, Halo Wars 2, NHL 18
Save/Load Game
This screen lets players save multiple play sessions into dedicated slots. Most games allow saving 3–10 sessions, but some games allow more.
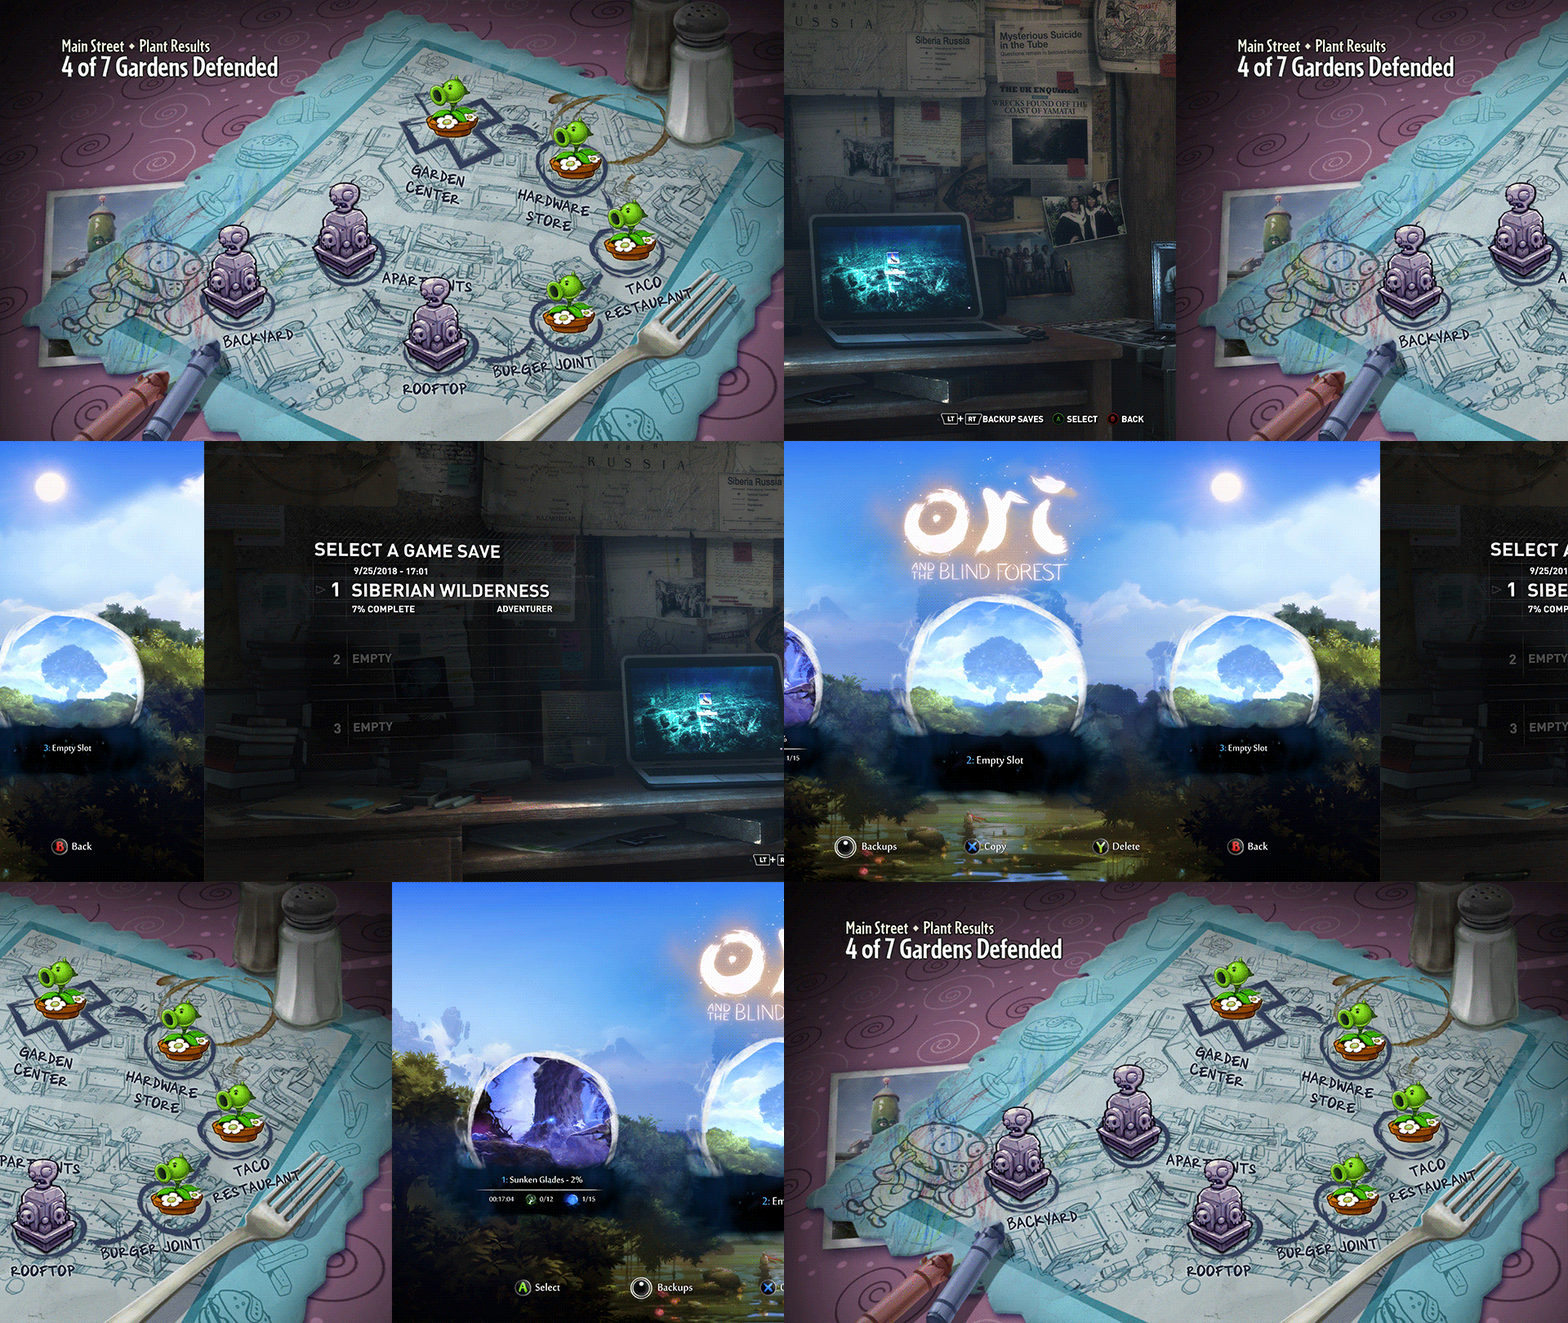 Screenshots from Ori and the Blind Forest, Plants VS Zombies Garden Warfare, Rise of the Tomb Raider
Use each slot to register and display the following stats:
- Slot number of the saved session
- Player’s name
- Date
- Description of the level (if applicable)
- Thumbnail for the level (if applicable)
- Player’s rank (if applicable)
- Player’s character (if applicable)
- Score and rating (if applicable)
In games played in a linear timeline, a saved session can chronicle the player’s progression on a map or timeline, to allow the player to revisit and replay any level or area. The more progression-related information (such as the rank and score) you show, the more replay you will encourage. Thus, present the map or timeline at the end of every game or at the completion of a level.
End of a Round, End of the Game
Display this screen to inform the player about the completion of the game, level, or round. Also display any relevant results, such as time, score, achievements, place, winner, loser, and leaderboard. Give the player an option to replay the game or to go back to the main menu.
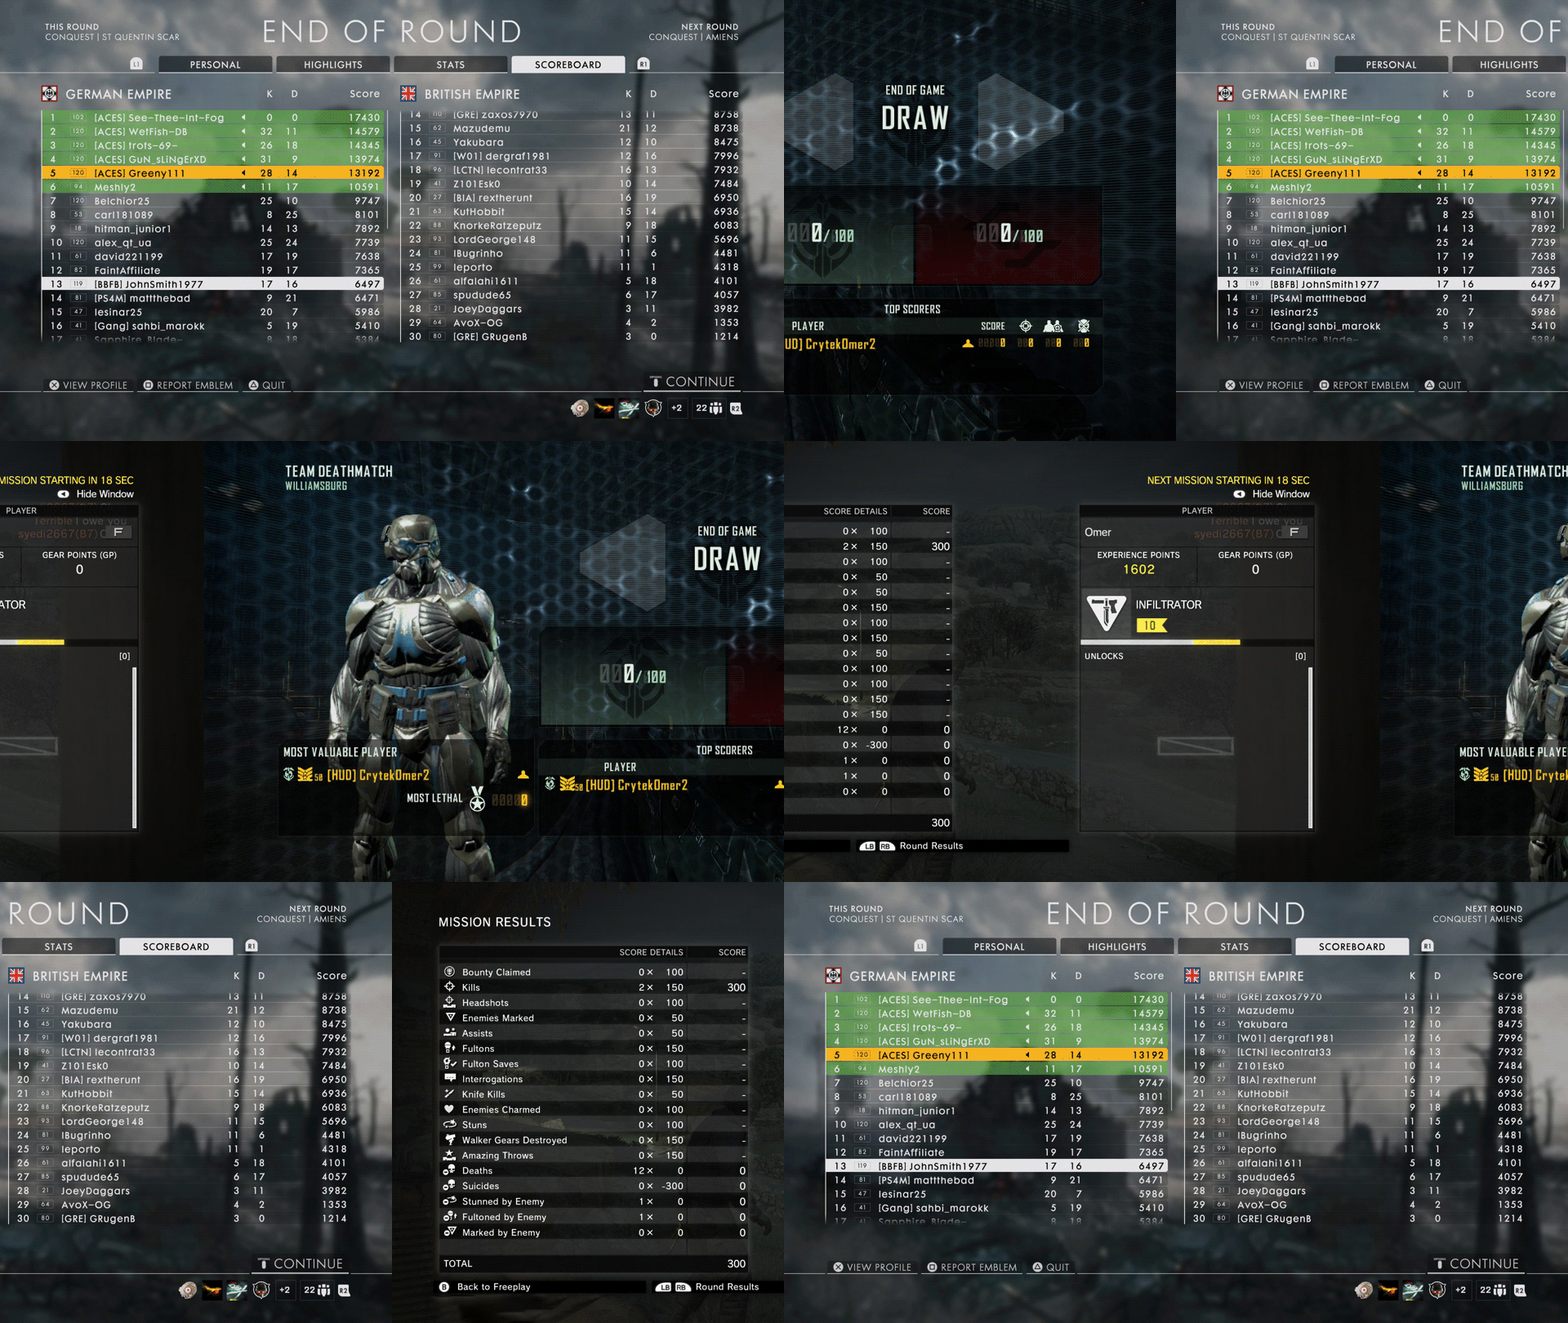 Screenshots from Battlefield 1, Crysis 3, Metal Gear Online
Break up the info into multiple screens, as many as needed to display all info legibly, and have the player progress through each screen, to the final overview screen.
Here are the components you might want to include on the End of Round screen:
- Score/Position: the results for the player or team, including score, point total, placement, rank, and level completed
- List/Grid: typically, a vertical list of stats per player or position
- Sorting: provide a clear way to sort different stats. This navigation typically uses a twist tab menu controlled through the LB/RB bumpers.
- Stats: the player’s stats and, if applicable, comparisons to other players’ stats
- Replay: navigation for quickly replaying the game
- Leaderboard: contains a link to a Leaderboard menu, or incorporates a Leaderboard into the list of players of the current game
- Achievements: Displays any awards and achievements completed during the gameplay.
Tip: Consider showing the achievements that the player is close to completing. This encourages replay and engagement within the community. If necessary, incorporate a link to the Achievements menu.
Lobby
The Lobby screen is where players wait for the game to load.
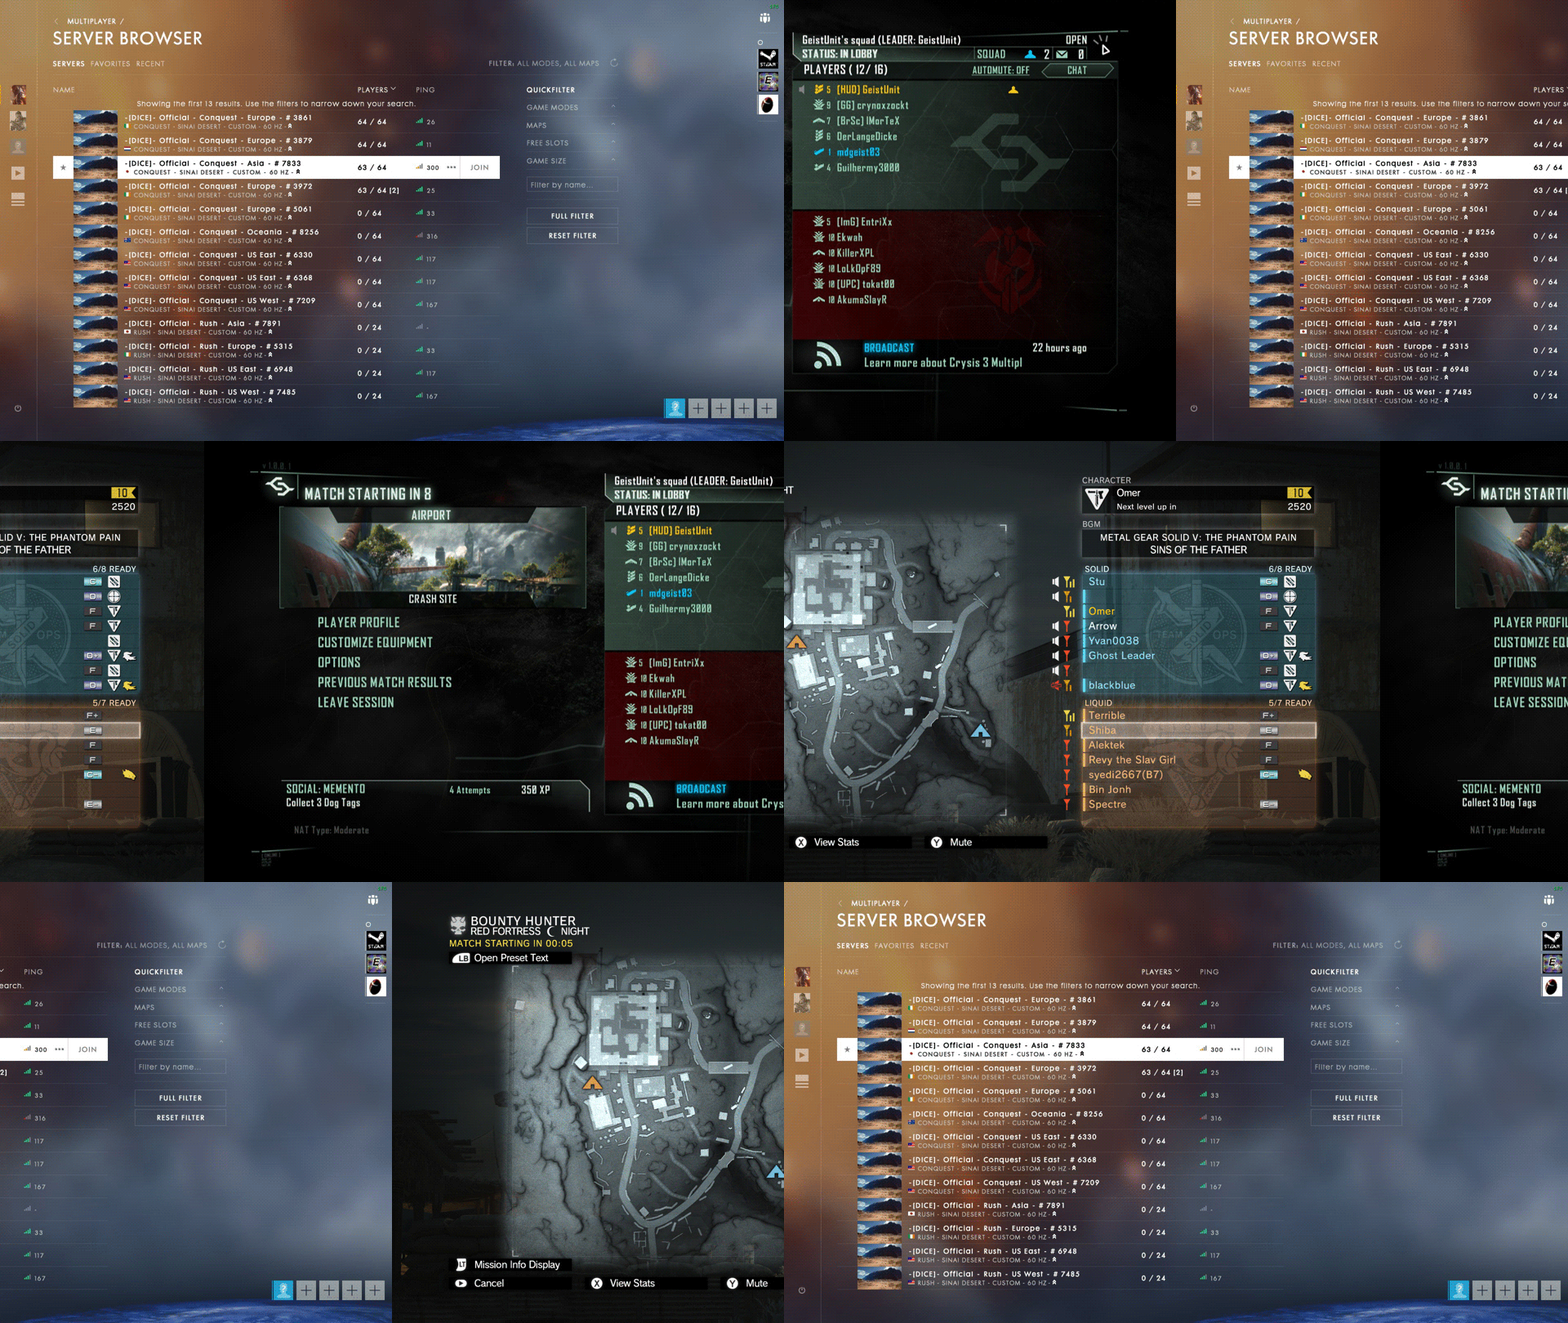 Screenshots from Metal Gear Online, Crysis 3, Battlefield 1
Provide one or more of the following components:
- Player List: A list of the players’ gamertag names
- Team List: If the game has the concept of teams, display the list of players in each team
- Team Captain/Host: Indicates who can change the map or settings of a game mode
- Player Rank: Helps identify strong and weak players in the game
- Player Loadout/Class: Some games have different types of classes as well as a customized Loadout (weapon and equipment) that players equip with before entering the game. This component is similar to the Player Rank and can provide insight about other players of the game, letting the player make necessary adjustments before the game starts.
- Game Map: player-selected map of the game
- Game Mode: player-selected mode of the game
- Game Settings/Rules: a detailed list of rules that can be set for custom game modes
- Countdown Timer: the time left before gameplay begins
A timer can be used to encourage the players to complete any last-minute adjustments.
- Ready Up: used instead of a countdown timer, to allow players to confirm they are ready to play; as soon as everyone’s status is Ready Up, the game starts
- Server Name/Location: the server and location from which the game will be running
- Invite Player: provides a way to invite a friend to a gameplay session; this is a great way to encourage gameplay
Lobby screens can get busy, so make the information easy to understand.
Customize
On this screen, players will customize their weapons and equipment. Because the customization page could get visually busy, ensure the information is clear and does not overwhelm the player.
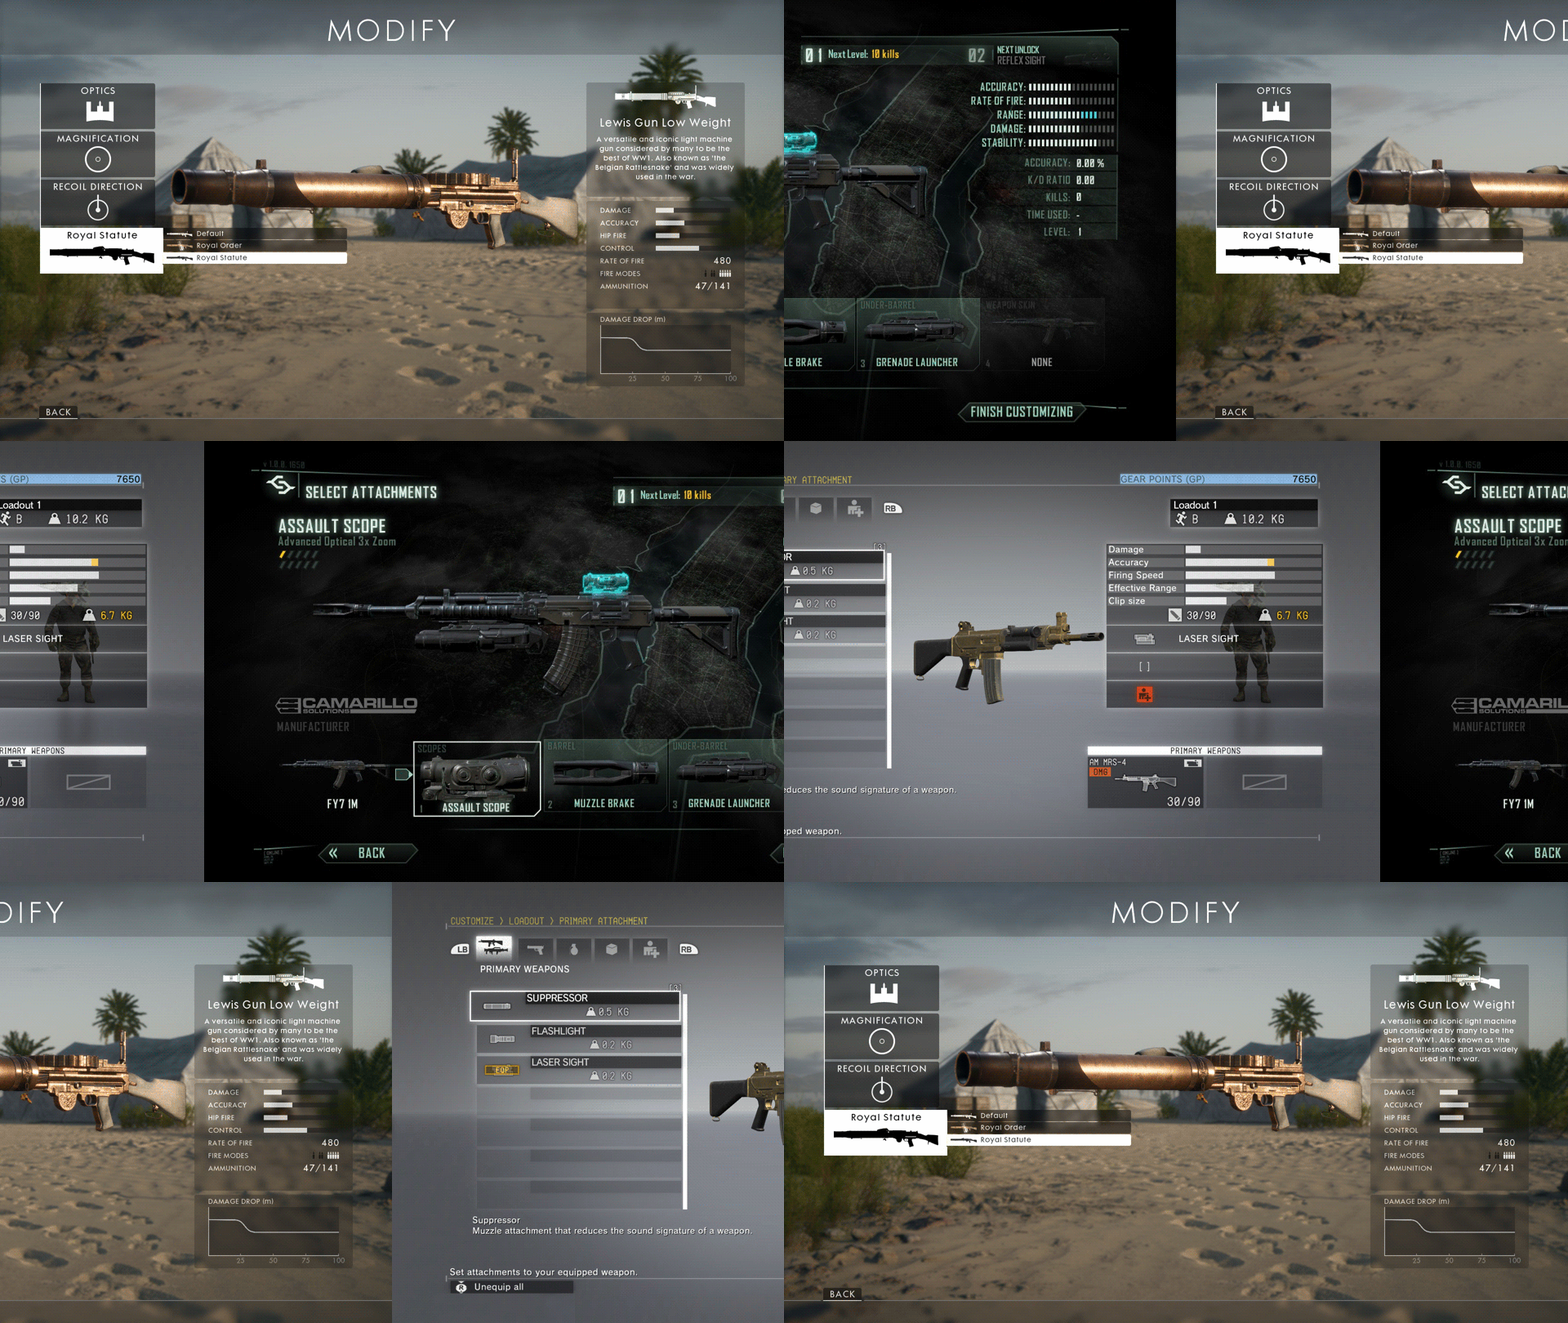 Screenshots from Crysis 3, Metal Gear Online, Battlefield 1
Provide one or more of the following components:
- Navigation/Sorting: Provide a clear way to sort and navigate to different types of weapons and equipment. We recommend a twist-tab menu controlled with the LB/RB bumpers.
- List/Grid: This vertical or horizontal list displays the item’s name, level or type, and image.
- Description: Display a brief description in a consistent location. Provide the name, description, and role in the gameplay.
- Stats: Use a stylized bar, percentage, or number.
- Price: This is a great opportunity to introduce upgrades and items for sale. Add the price next to each item and provide a dedicated button for purchasing and renting additional items.
- Item: The selected item must be large enough for all details to be distinguishable. If possible, make the item 3D and capable of being rotated in 3D space.
Loadout
The Loadout screen is where the player selects weapons and equipment before entering the game. To drive competitive monetization and customization, include direct links to the Loadout screens of the player’s teammates and competitors. Also display purchasable items and upgrades, and if clicking them will take the player to other screens, then add links from those screens back to Loadout.
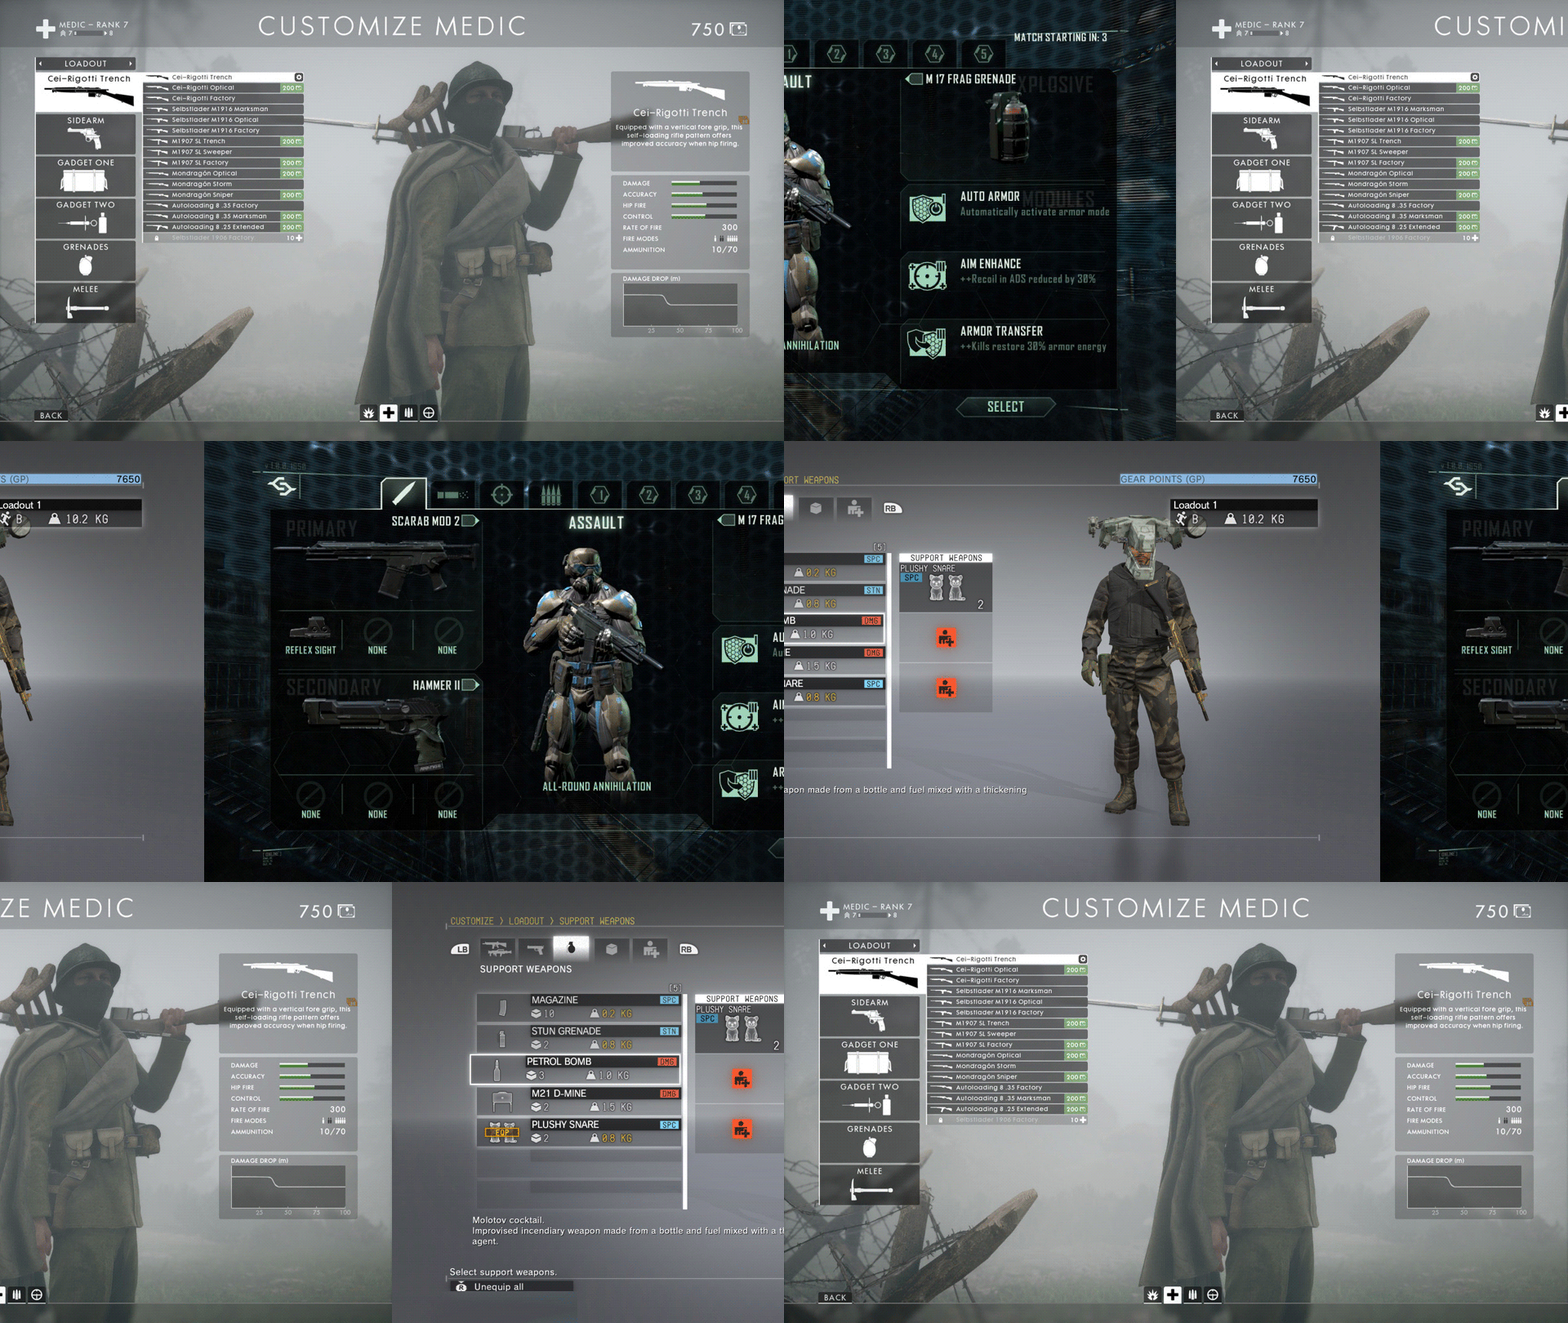 Screenshots from Battlefield 1, Crysis 3, Metal Gear Online
Provide one or more of the following components:
- Navigation/Sorting: Provide a clear way to sort and navigate to weapons and equipment, such as through a twist-tab menu and the LB/RB bumpers.
- List/Grid: This can be a vertical or horizontal list or grid that displays the item’s name, level or type, and image.
- Character Model: Display a 3D model of the character or vehicle, along with the Loadout choices selected.
- Stats: If applicable, show the player’s overall strength, health, and offensive and defensive skill totals that are based on the current Loadout.
- Price: Introduce items for sale or upgrades in the game. Add price next to each item. Provide a dedicated button for purchasing and renting additional items.
- Currency Total: Always display the player’s currency total on the page where items are offered for sale.
Leaderboards
Leaderboards have been part of video games since the coin-operated games of the 1980s. In the past, leaderboards were used to show players’ progression and to promote competition.
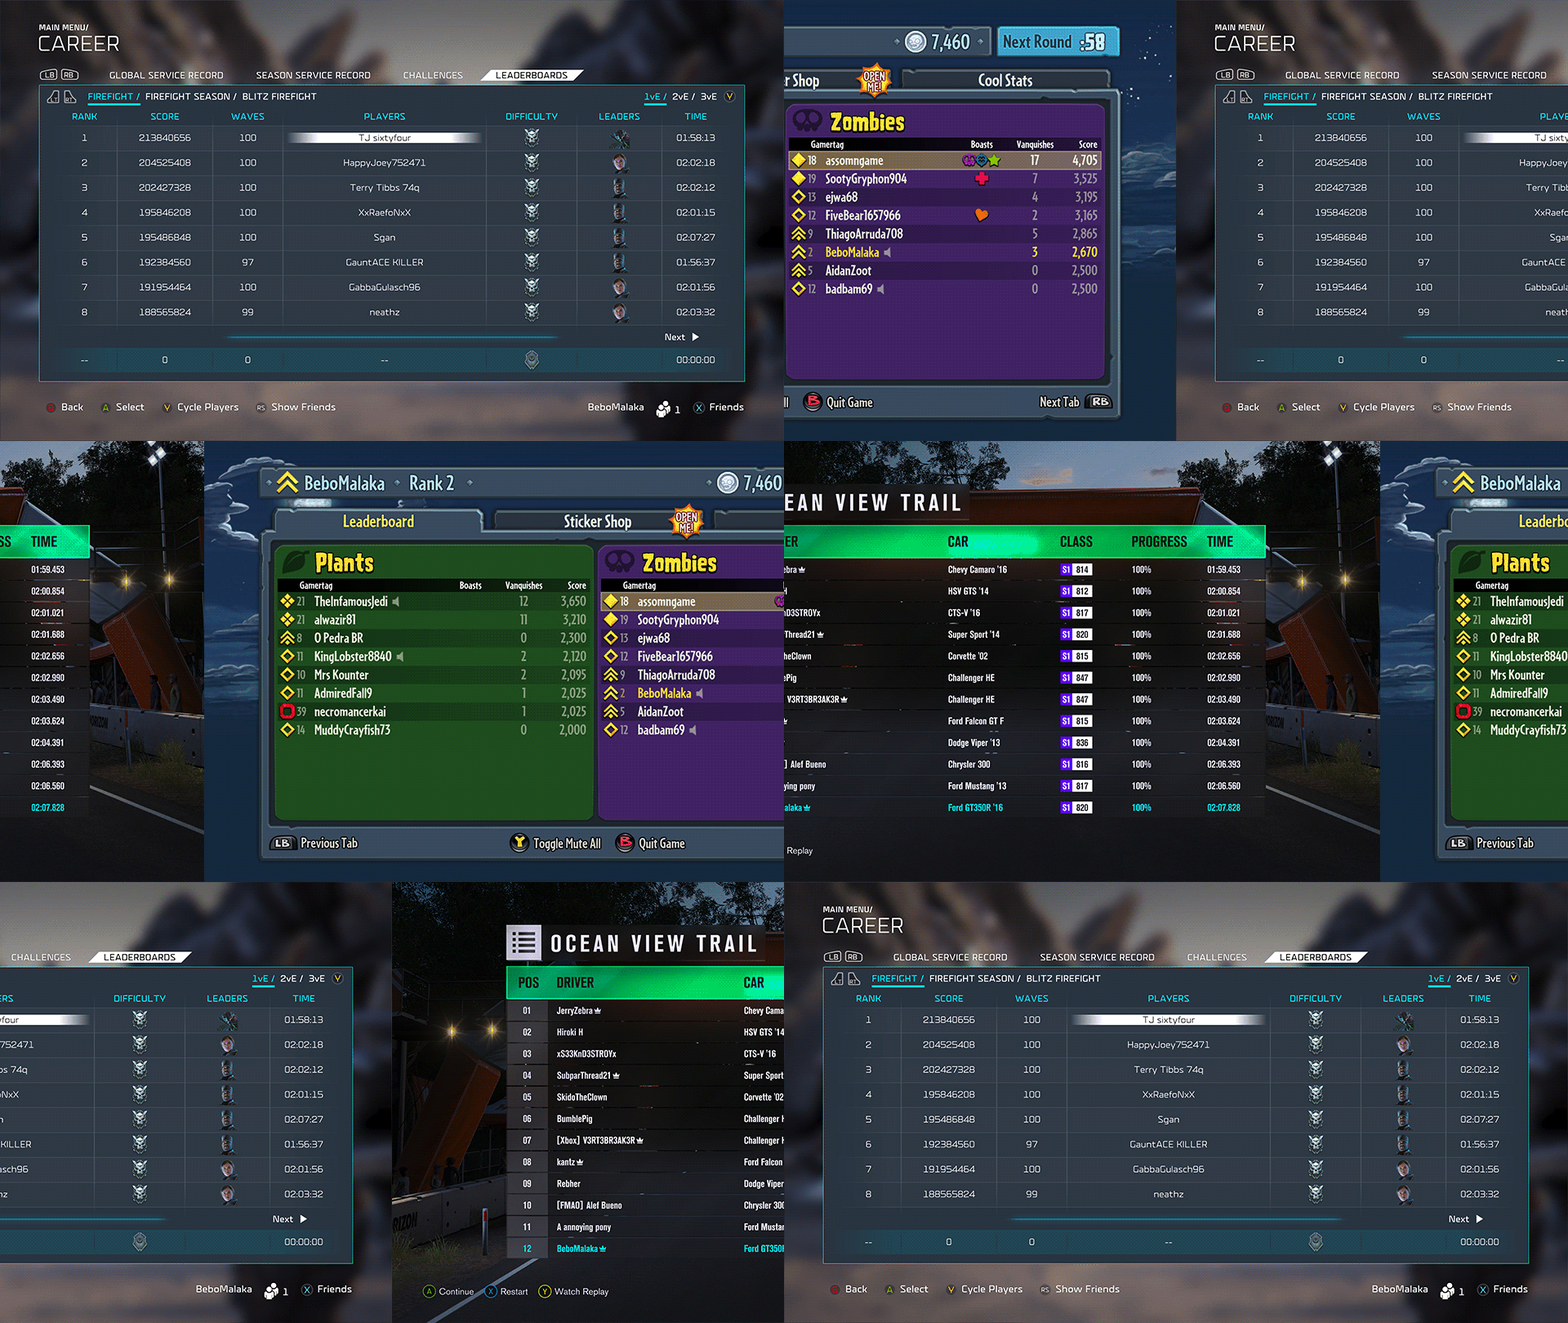 Screenshots from Plants VS Zombies Garden Warfare, Forza Horizon 3, Halo Wars 2
Today, leaderboards are also used to display various stats and comparisons between players, friends, and teams:
- High Score
- Best Time
- Level Rating
- Gameplay Stats
- Kills
- Hits
- Offensive Plays
- Defensive Plays
- Player Rank
- Player Level
- XP Totals
Tips: To track stats over time, include a date-time filter and allow filtering within a date-time range. If a leaderboard is tracking a large list of players, consider displaying two leaderboards: Top 10 players, and a personal leaderboard that shows other players’ scores that are similar to the player’s current score.
Achievements and Trophies
Achievements in Xbox are the equivalent of Trophies (Gold, Silver, and Bronze) in PlayStation. These two concepts describe a player’s progression over the life of the game; they do not represent session-based tracking, such as that shown in leaderboards.
Achievements encourage different types of gameplay tasks and are used to issue points, called GamerScore, when the player completes the game. This GamerScore is then totaled for individual gamers’ profiles and displayed within the Xbox shell experience.
Skill Tree
Skill trees are used to upgrade a game character by unlocking its special abilities or by upgrading or enhancing its existing abilities. The player uses the game’s currency to upgrade the character up the skill tree.
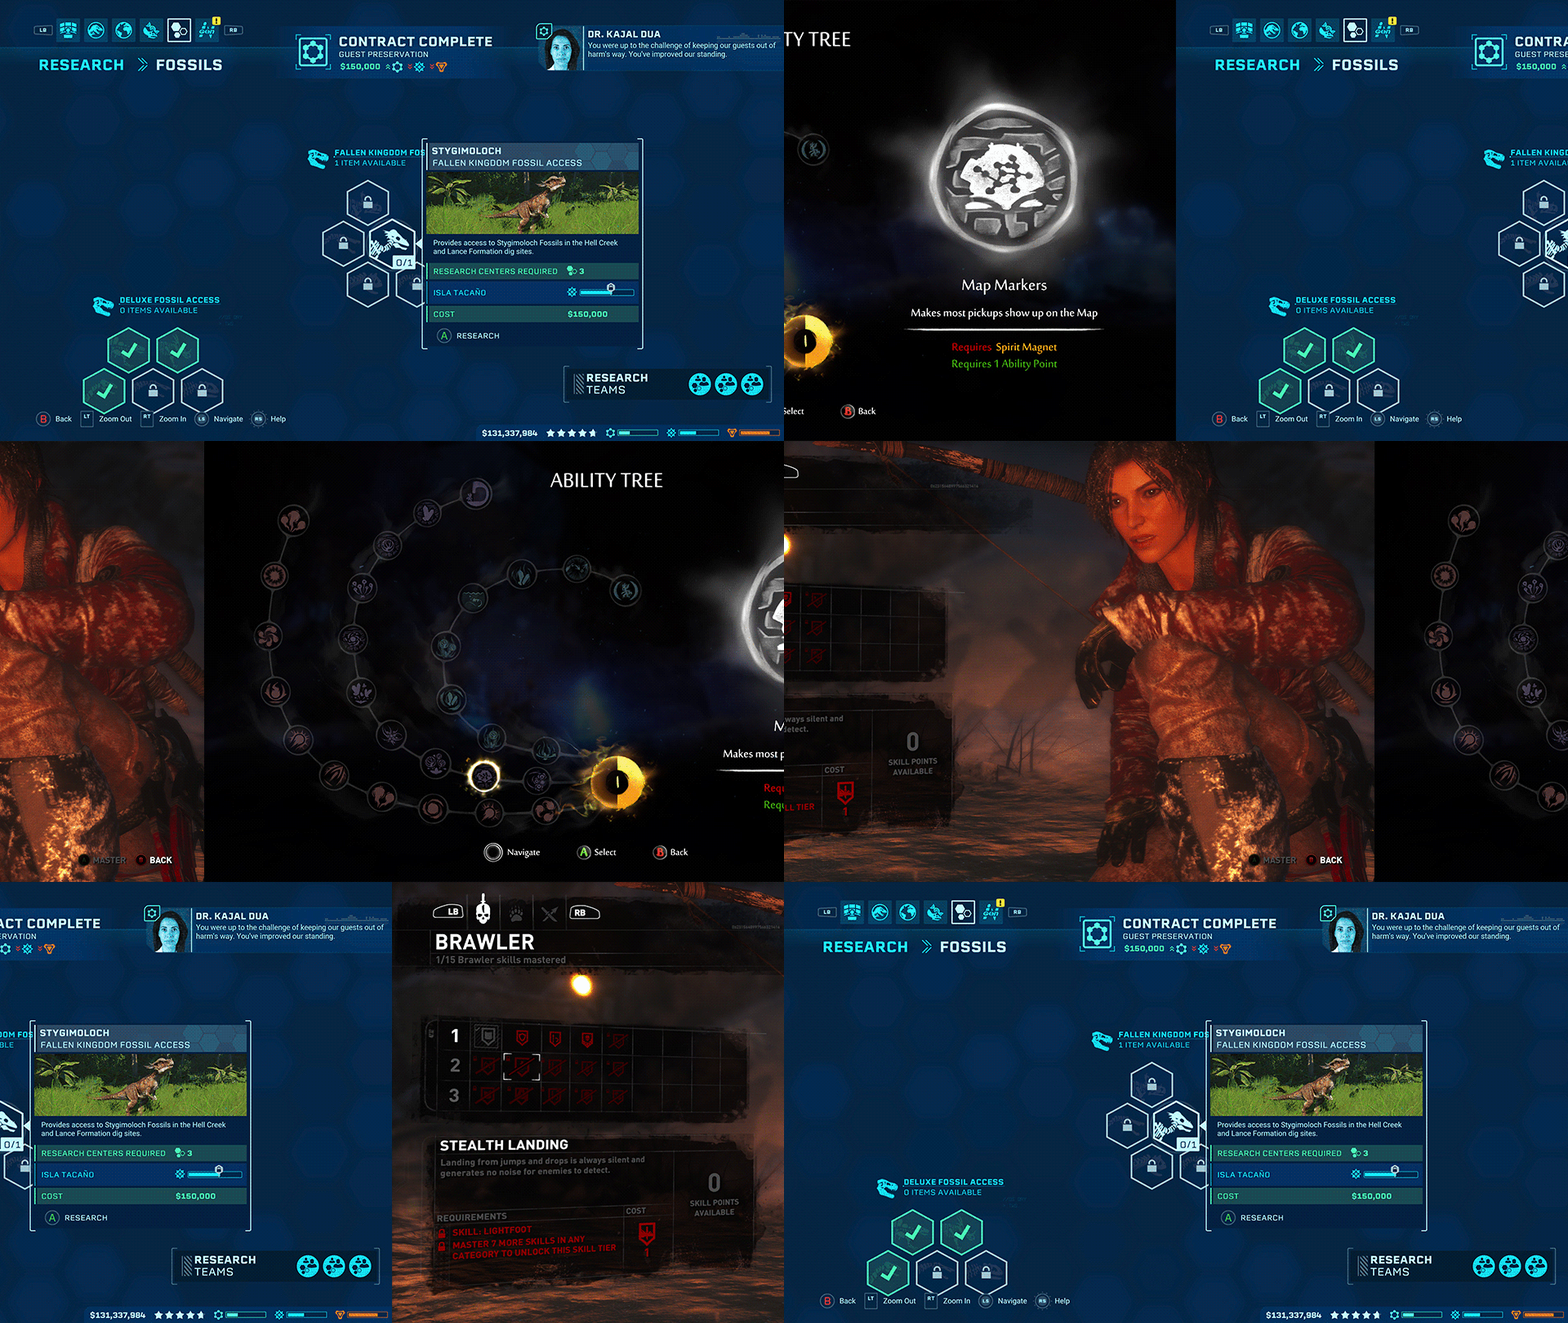 Screenshots from Jurassic World Evolution, Ori and the Blind Forest, Rise of the Tomb Raider
Skill trees are challenging to design, because the structure and branching of skills can become complicated and non-linear. The following steps should make this task easier:
- Determine how your character can be upgraded.
- Make the progression easy to understand.
- Establish a clear method for handling owned, available, and locked items.
- If possible, keep categories as separate groupings that have minimal or no overlap with other categories.
When a skill is in focus, display a secondary component that shows the skill’s name, description, image (if applicable), and cost or requirement for acquiring.
Tip: Display messages that educate the players about acquiring skill points.